The Dodge and Burn tools refer to two traditional darkroom printing techniques, in which areas of a photo print were given more exposure to darken the areas (burning), or less exposure to lighten the areas (dodging). The effect is similar to using selective Levels or Curve adjustments, but you simply paint the effect onto your image rather than using layer masks.
It’s good practice to create a duplicate of your Background layer, and do your dodging and burning on this new layer. This enables you to easily assess any adjustments you have made by switching between the layers, and also get back to your original image if your first attempts go wrong.
The most common mistake when using these tools is applying too much of effect in one adjustment, so the darkening of lightening is obvious and uneven un the final image. To avoid this, set the Exposure to a low amount, between 3% and 5%, and slowly build up the effect. The other way to ensure the effect is subtle is to use a large soft edged brush when using the Dodge and Burn tools.
The Dodge tool
The Dodge tool is used to lighten areas of your image. You can choose whether you lighten the highlights, mid-tones or shadows. Lightening the highlights will increase the contrast between these and the shadows. Lightening the shadows reduces the contrast.
YOU MAY ALSO WANT TO KNOW ABOUT ALL THE SHORTCUTS OF PHOTOSHOPS
The Burn tool
This has the opposite effect to the Dodge tool. Again, you can choose whether the tool affects the highlights, mid-tones or shadows. Darkening the shadows will increase the contrast in these areas, and darkening the highlights will reduce the contrast.
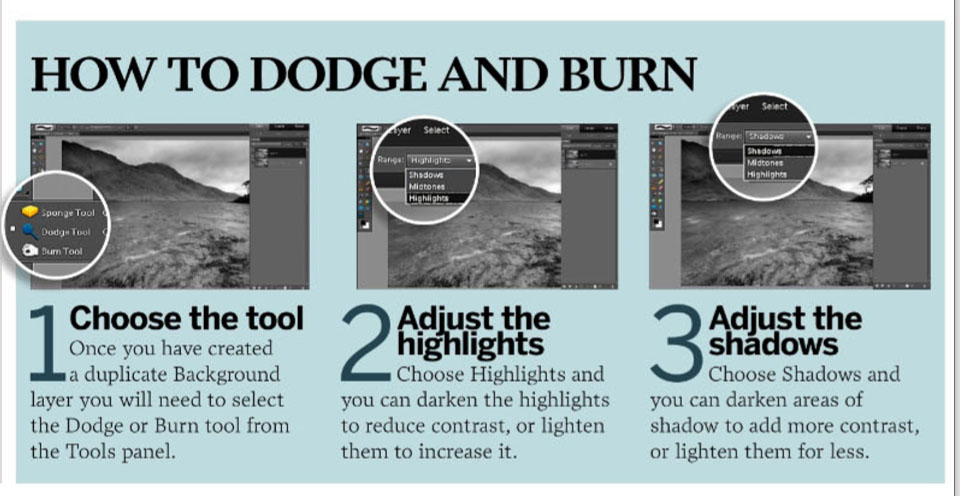
How to Dodge and Burn?
- Choose the tool: Once you have created a duplicate Background layer you will need to select the Dodge or Burn tool from the Tools pane.
- Adjust the highlights: Choose Highlights and you can darken the highlights to reduce contrast, or lighten them to increase it.
- Adjust the shadows: Choose Shadows and you can darken areas of shadow to add more contrast or lighten them for less.
Taken from magazine chapter Teach yourself Black & White Photography, Future Publishing Limited, Editor Emma-Lily Pendleton, London